Sunday, December 6, 2015
Friday, November 27, 2015
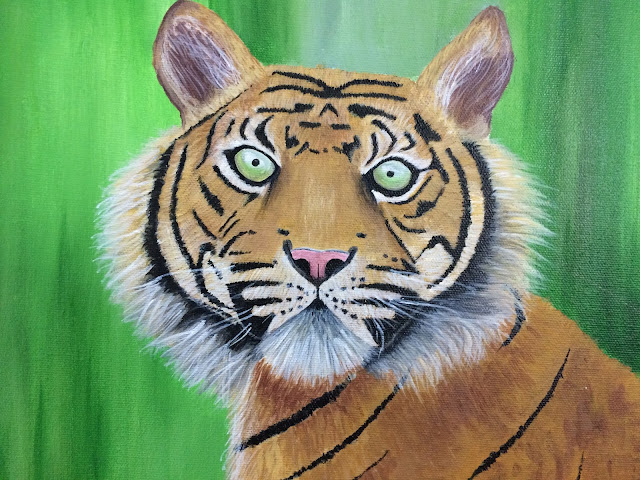
Amur Tiger
Amur Tigers or Siberian Tigers are an endangered species with only about 500 left alive!
Here are some cool facts about these majestic animals.
 |
| Acrylic on 8x10 canvas |
This was a fun one. It was nice to get back to acrylic painting after fabric painting. I took a lot of time with this one. I was trying to achieve depth and airiness in the fur. I hope it has come through.
Here are some step by step pictures showing the tiger sort of come to life.
 |
| First the outline on canvas |
 |
| Then some background and more details on the face |
 |
| Added some base colors |
Some more details in the fur and the eyes are almost done. They look a little too big and bright at this point.
After a lot more details and small strokes in, the face is looking good. Here is a close up of just the face.
I hope you enjoyed the pictures! :)
Monday, November 2, 2015
Day of the Dead
This post couldn't have been done on a better day, since today is the Day of the Dead! For those of you who have never heard of this festival before, here is a nice read: Day of the Dead.
The sugar skulls are a work of art. There is so much art and history associated with it. The fascinating part is how something as eerie as a skull, can be turned into something so beautiful with art.
I made these shoes for a friend who loves skulls. :)
Step 1 was to get a good base coat on the shoes. I toyed with the idea of using acrylic paints v/s using fabric paints, just because I have so many more colors and shades of acrylic paints with me. But, after much research on the internet, I found out that acrylic paints on shoes will tend to crack with time. So, I stuck with the fabric paints.
Step 2 was to finalize on the design. I like to first sketch with pencil on paper to get an idea of size and placement. Then I sketched the same on the shoes.

Step 3 is the fun painting part. :)
Just the skull was looking dull so I added some black. Makes a big difference!
Painted the other shoe. I added blue hair to bring some color in.
They make a lovely pair, don't they?? :)
Sunday, October 4, 2015
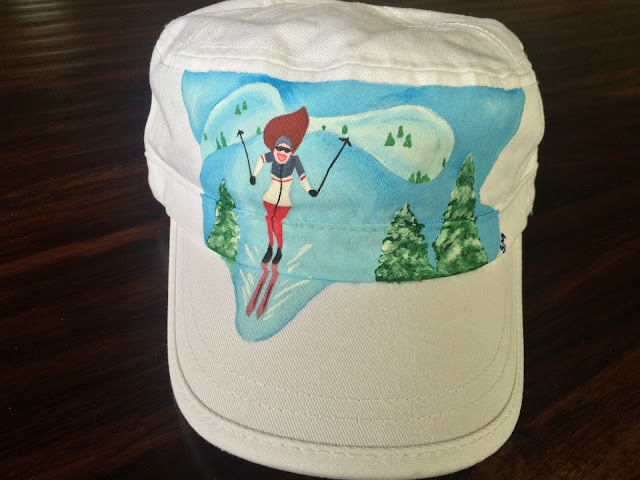
Ski ski ski... away...
This cap is for my crazy ski bum of a friend. She saw the caps that I painted previously and requested a ski themed one. I think this will look darn cute on her. :)
This is my first women's cap too. I quickly realized that I dont have the same kind of flat surface as the men's hats too. It was a bit of a challenge getting the shapes right on hat since the fabric is not as tight. I decided to keep it simple with a basic ski scene - snow, trees, and a happy skier.
First I did the snow, then added some trees to bring a sense of depth to the picture. Don't miss the snow on the trees. They look so pretty with the snow on them.


Sunday, September 20, 2015
Fun Fantasy Fun
I recently discovered how much I missed fabric paints! When I was younger, I used to do a lot of fabric painting. I have painted everything from T-shirts to pillow cases to table cloths to bed sheets. I made a lot of pieces for friends and family back then. My mom might still have some old faded ones in a closet somewhere. :)
I had never painted caps before and I must say it has been a lot of fun. Here are a few of the caps I have made recently.
1. The first one I made was this "Sharingan" cap for my hubby. Anyone who reads and follows Manga would know what this is.
And for those who have no idea what Manga is, here is how google defines it. :)
The Sharingan is a special type of dojutsu (pupil technique) that naturally occurs in all members of the Uchiha clan. It grants sort of super powers to those who can use it.
2. The second one is a Colorado themed cap. This cap combines the majestic Colorado mountains with the Colorado Flag. This is by far my favorite one.

3. Last one, is another one from a comic called "Bleach". The character here is the hollow within Ichigo Kurosaki. Another one for the hubby. :)
Even though I don't follow Bleach, I think the cap looks pretty cool.


I am really into the fabric paints right now. More to come soon. :)
Sunday, June 14, 2015
Unusual Friendships
Next I added some evergreen trees in the background and grass. I learnt a lot during this painting. I very rarely do landscapes so this was quite an interesting one.
To bring more interest to the painting, I added a stream with some stones. I think that came out pretty good. Now for the actual bear and the wolf.
Here is a close up of the bear and the wolf. I tried to add as much detail as possible here.
Here is the full painting.
Monday, June 1, 2015
Summer is here!
 |
| Colored pencils and Water Colors Nothing so rare as a day in June, the air so fine and the blossoms all blue. The weather just perfect, the skies never gray The bugs always buzzing and the tree's seem to sway The sun beats so warmly on the tenderness of my skin, and the birds..they fly, far away in the wind, June is the month that carries a tune, it's beautiful melody floats like a balloon. Source: http://www.familyfriendpoems.com/poem/nothing-so-rare-as-a-day-in-june#ixzz3bfRuWMJH |
Friday, May 29, 2015
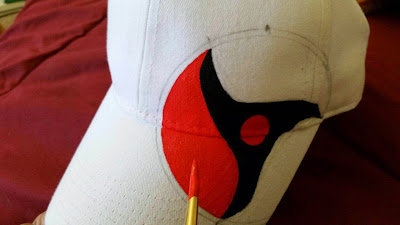
Sharingan
My husband has had this plain white cap for a while now and one day while we were out with friends, I had the idea to paint his cap. I then proceeded to google and found that hand painted caps are a thing! Who knew! I asked him what he would like on a cap and he picked a Sharingan.
I have worked with fabric paints before but that was almost 10 years ago! So, I went to the store and bought a few basic colors. They are pretty easy to use. The colorless extender helps in blending and I usually use a little bit of water if I feel the paint is too thick to do the outlines.
As usual, I started out with a pencil sketch. A geometric compass is very handy when you need those perfect circles. :)
I started with the center of the eye and worked outwards. The color is pretty opaque on white surface. One coat was enough.
I didn't want to leave the white as is around the eye. So I decided to give it a gray/black/white background. Even though the background was fun, it took way longer than I expected. But I think the background makes it look complete.
Usually on fabric, once the painting is dry you iron the back side of the painting to heat set it. That way its washable and the paint wont come off. On a cap, the iron was out of question, so I used a hair drier and heated the inside of the cap. Hopefully that's enough!
At the end of it, I have an ecstatic husband who wants me to paint another cap for him. :)
I have worked with fabric paints before but that was almost 10 years ago! So, I went to the store and bought a few basic colors. They are pretty easy to use. The colorless extender helps in blending and I usually use a little bit of water if I feel the paint is too thick to do the outlines.
As usual, I started out with a pencil sketch. A geometric compass is very handy when you need those perfect circles. :)
I didn't want to leave the white as is around the eye. So I decided to give it a gray/black/white background. Even though the background was fun, it took way longer than I expected. But I think the background makes it look complete.
Usually on fabric, once the painting is dry you iron the back side of the painting to heat set it. That way its washable and the paint wont come off. On a cap, the iron was out of question, so I used a hair drier and heated the inside of the cap. Hopefully that's enough!
At the end of it, I have an ecstatic husband who wants me to paint another cap for him. :)
Monday, March 30, 2015
Tangled Butterfly
I saw these colored zentangle pens online and had to buy them. What's better than a black/white tangle? A colored one. :) These just open up so many doors of inspiration.
Butterflies are just beautiful tiny pieces of art in nature.
I tried to keep the tangles more on the geometric side while adding more detail to the zentangle. Here is a close up of the butterfly. Doesn't it look pretty? :)
I also did another abstract one with just the black pen. This one is more about just letting your mind direct the pen, the way it wants to.
Sunday, March 8, 2015
Turtle Love
My love for sea turtles began on a Snuba expedition in Maui. They were my favorite part of the day. They were just so peaceful... so zen like! They made the big scary ocean seem calmer. Fortunately our Snuba instructor managed to capture a good photograph of a sea turtle and as soon as I saw it, I knew I had to paint it. So, after a few months of procrastinating I got right on it.
This time I decided to take pictures along the way. I don't know about you, but I always enjoy seeing step by step progress of art being created.
I started with a 6x8 canvas and painted my background and got a rough sketch of the turtle on it.
Then I painted in the turtle with the basic colors with lots of details to be still added. This is usually the most intimidating stage for me. All the work ahead is exciting and scary at the same time. :)
I then added more detail to the shell and the face. Also added more color to the body. Slowly getting there...
This is my favorite stage in the painting... painting the eyes. As soon as the eyes are painted in, the painting almost comes to life!
Then whats left were the flippers and final touches. I re painted the background to make it more polished and added some small fish around the turtle to give it a sense of depth and size.
Voila! And of course I had to sign it. :)
 |
| Sea Turtle - Acrylic on 6x8 Canvas |
P.S : If anyone would like to own this piece of art, contact me.
Subscribe to:
Comments (Atom)


